
A good friend has just been to have some Semi Permanent Make Up done, and as Semi Permanent cosmetics are becoming a very popular treatment I felt it would be very relevant to feature it on my blog.
Imagine not having to spend time every morning applying your make up, smudge proof, and precise, you'll always look your best.
What is Semi Permanent Make Up?
It is a type of cosmetic tattooing that uses pharmaceutical grade pigments applied to the skin. The aim of the treatment is to give a permanent natural make up appearance that perfectly complements the skin tone using the right combination of pigments to enhance natural features.
What are the benefits?
Semi permanent make up applied to the eyebrows can be used to frame the face and improve the shape and definition of the eyebrows. Three dimensional hair simulation techniques can give the appearance of hair growth for those with patchy hair growth. Semi permanent makeup can be applied to the eyelids to enhance the natural eye line to make the eyes appear bigger and brighter. Semi permanent make up can also be used on the lip border as permanent lip liner to achieve fuller more defined lips.
How Long does it last?
You can expect results to last between 12-18 months, maybe even longer!
How much does it cost?
You should expect to pay anything from £260+ but prices vary depending on the individual & you'll be given a quote on consultation.
How much does it cost?
You should expect to pay anything from £260+ but prices vary depending on the individual & you'll be given a quote on consultation.
Personally I think the results are fab!
So here is Jenna's review on her treatment.....
I have wanted my eyebrows to be better for as long as I can remember. This summer I changed to brunette from being blonde for most of my life and straight away felt my eyebrows didn’t look right because they were too light being a naturally mousey colour. I became obsessed with pencilling them in and quickly got hooked on eyebrow stencils to try and change the shape a little... this obsession continued even though I am now back to blonde and it was starting to get on my nerves drawing them in every day.
My work colleague had her brows done about 2 years ago and it was coming up to the time when she needed the touch up doing, so she kindly invited me along to watch and ask some questions. I attended The Hyde Park Clinic in Plymouth
I was sent away with a small pot of numbing cream as I was concerned about pain being the biggest wimp going, and also provided with a sanitising wipe and a little brush to apply the cream. I had to apply this at least half an hour before my appointment to let it get to work. Maximum results are about 45 minutes so any longer is pointless.
 |
| Right Side Natural Brow |
 |
| Left Side Natural Brow |
I looked really tired and could see that my brows naturally sloped down; Julie told me that in terms of eyebrow rules, mine broke every single one and even the hair grew down!! I booked in there and then and was completely sold!
I was sent away with a small pot of numbing cream as I was concerned about pain being the biggest wimp going, and also provided with a sanitising wipe and a little brush to apply the cream. I had to apply this at least half an hour before my appointment to let it get to work. Maximum results are about 45 minutes so any longer is pointless.
When I went for the appointment I was taken to the lovely calm and clean treatment room and Julie talked about all the various colours available and showed me the ink she intended to use by simply sweeping a bit in a rough eyebrow shape over my own brow. Julie explained that the inks are made with naturally occurring pigments unlike that of actual tattoo ink, making it easy to create a natural look. There are approximately 12/15 colours the inks come in and these can be mixed to create just about every natural occurring colour there is! I was shown the needle that was going to be used in its sterile sealed packaging and Julie even wore gloves and a face mask.
First of all I showed Julie some photographs I had found on the Internet of different celebrities and eyebrows I liked the look of. My idea of the shape I thought I liked had changed a little from my consultation and I was glad of the two week gap between seeing her again to do some research on what I really wanted. I then had the brow shape drawn on with a charcoal pencil, along with some technical measuring tools and a ruler to make sure they were even for my face. This is where we agreed on shape and I had some photos taken to show me what it looked like from all angles. In this time I also had some of my natural brow hair plucked away as it was completely out of place. Then for the fun bit....
Julie starts by using a few strokes with the needle to ‘break the skin’ this helps her to produce an outline before applying a further numbing treatment. This was the most painful part and I can only describe it as a scratching pain which is worse around the brow bone area. At this stage some ink had already begun to be applied – I had the colour chocolate treasure which I thought sounded delish! Julie applies an anaesthetic gel which is clever in that it stops any bleeding allowing her to be able to see exactly what she is doing.
When the procedure started again I could hardly feel anything and only the vibration of the needle and some pressure where it was being applied was all I could feel. I am the worst person with pain and everything hurts me, but I promise you this was absolutely fine and if I can take it anyone can! The colour of my brows was gradually built up going from one brow to the other the other and I was allowed to look periodically at the progress. All in all it took around 30/45 minutes to have the tattooing done.
Julie takes some final photo graphs and even made my lay back down a couple of times just to perfect them even more.
And here they are straight after the treatment.....
Julie takes some final photo graphs and even made my lay back down a couple of times just to perfect them even more.
And here they are straight after the treatment.....
 |
| Before |
 |
| After |
Immediately after the area around my brow looked white, this was down to the numbing gel on the skin and slowly over a few hours the colour came back completely. They felt a little sore afterwards but nothing too bad. Julie told me to take a paracetamol or ibuprofen later if the pain got worse (4 hours later and I can’t feel anything so far)
I am absolutely thrilled with the results and they are not even finished yet. They are expected to now go quite dry whilst they heal and the scab will flake off revealing the result. Sometimes up to 70% of the colour can come away so Julie always makes sure she does the treatment in two sessions. I am expecting them to look quite a lot lighter in a week or so, but at least I will be in the position to add more and not stuck with dark eyebrows. Julie also intends to add another colour on my second session and maybe even a third, creating a really dynamic, natural looking colour.
Aftercare is simple: you leave the clinic with a thin coat of Vaseline to protect the newly broken skin... you are not allowed to put makeup on the area until the flaking/scab stage has passed. In terms of washing you can wash your hair normally and let the soap go over your face, just do not rub at them, same with actually washing your face, just avoid the eyebrow area.... I have already found that using a face cloth is the easiest way so you can watch exactly where you are cleaning your face without accidentally catching your brows.
After about 3 days I have been told to expect some itching whilst they heal... again no rubbing or picking as this can cause the pigment to come out!
After the touch up the brows are expected to last approx 18months before they will need touching in again, as with the name they are semi-permanent... this is 100% a better procedure than a normal tattoo because your eyebrows will need to change throughout the course of your life. Imagine being 70 with the eyebrows that looked hot on you at 20?!
My before pictures show exactly how poor my natural brow shape was, very random hair growth and a very flat shape... I would like to add I am missing hair in these pictures because on my consultation I got Julie to pluck it away so I could clearly see the shape she had drawn for me... my down turning brows were ruining the effect!
Here are my brows 2 days after my treatment....
Here are my brows 2 days after my treatment....
 |
| Before |
 |
| 2 Days After Treatment |
 |
| 2 Days After Treatment |
 |
| Left Eye In Natural Light |
 |
| Right Eye Natural Light |
 |
| Right Eye In Shade |
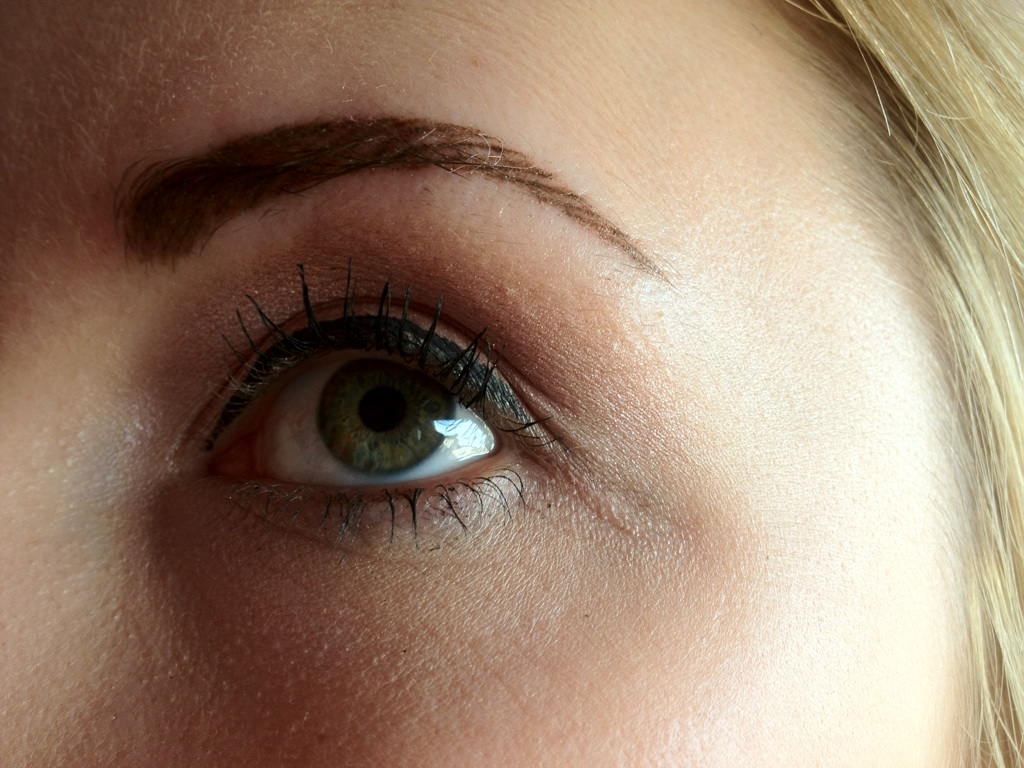 |
| Left Eye In Shade |
Please be sure to mention Jenna Hull if booking in with Julie and also this blog!
Would like to say a HUGE thank you to Jenna, for her review, and pictures & for letting me post them for the world to see!
And of course thank you to Julie Steadman & Hyde Park Clinic Plymouth, for the treatment!
If you'd like to learn more about the procedure please check out these links:
Julie Steadmans Webpage:
http://www.avoirsemipermanentmakeup.co.uk/about_us.htm
Hyde Park Clinic Plymouth: http://www.hydeparkclinic.co.uk/
What do you think of the effects of Jenna's semi permanent make up? Would love to hear your views.
CF xxx


“Imagine not having to spend time every morning applying your make up, smudge proof, and precise, you'll always look your best.” – Exactly what permanent makeup is for. It’s a common misconception that the treatment will hurt like getting a tattoo, but it’s just really a mild discomfort, which in Jenna’s case, is actually non-existent. Emily @ Age Less Laser Centres
ReplyDeleteYour post is really good providing good information.. I liked it and enjoyed reading it. Keep sharing such important posts. semi permanent make up seoul
ReplyDeleteNice article as for me. It would be great to read something more concerning this theme. The only thing it would also be great to see on this blog is some pics of some gadgets.semi-permanent makeup kore
ReplyDeleteThanks for sharing wonderful information. Really Nice And Informative. Keep Up the Good Work. I am searching top & best permanent makeup treatment center offering Permanent Makeup Near Me at Cost Effective Prices.
ReplyDelete